Sunday, September 16, 2012

Week 4: The Next Step: Increases, Decreases, Binding off

So by now you should have figured out how to knit a piece of fabric using combinations of knit and purl stitches. You should have also figured out that this isn't really going to take you anywhere. No matter what combinations of knits and purls you use, you're still going to be knitting nothing but squares and rectangles. It's very difficult to turn a square or rectangle into a pair of socks, a sweater, or mittens. This is where it becomes important to learn increases and decreases.

Learning how to increase and decrease will expand your options. Instead of knitting just squares and rectangles, you'll be able to knit just about any shape you'd like (especially when combined with tubular knitting in the round, which we'll learn in just a couple weeks).

Increases

So there are quite a few way to make an increase, and each is used for slightly different reasons. One increase might lean slightly to the left, one type may leave a little hole, and another may lean to the left. Knitting patterns will call for specific types of increases, but the kind of increase shown in this next video is a very common and very useful one. By knitting into a stitch twice before sliding it off the needle, you create two stitches where one used to be. This stitch is called a Knit Front And Back (which may be abbreviated as a K1FB, or KFB). Watch the video and give it a shot.


To practice increases, you can simply cast on one or two stitches. Then on every other row (all rows when side A of the fabric is facing you), increase every other stitch. This will form a triangle that gets wider and wider the more you knit.

Decreases

The decrease is the opposite and compliment of the increase. Instead of turning one stitch into two, you're simply going to turn two stitches into one. There are quite a few ways to do this, just like there are quite a few different ways to increase. Each different way has slightly differing results. One type of decrease might slant to the right, another might slant to the left, etc. Perhaps the easiest and most common way to decrease is the Knit Two Together, or the K2TOG.


To practice, take your same triangle you just knit to practice increases, and do the opposite. On every other row, decrease every so often--- knit, k2tog, knit, k2tog, etc. Or try knit, knit, k2tog. Knit, knit, k2tog. You'll find that different patterns of increasing and decreasing for different kinds of shapes. Try just decreasing the first and last two stitches of a row, or just decreasing the middle. Play around with mixing increases and decreases. You'll be amazed at the variety of shapes your knitting with produce.

Binding Off

You may have already tried taking your work off the needles when you're "done" knitting a piece of fabric. And what happened? The whole thing slowly begins to unravel. Loops get pulled through loops, and all that you get is a pile of tangled yarn. So what do you do when you've reached the end of your work, and you want to have a lovely scarf that doesn't fall to pieces when you wear it? You bind off.

Binding off simply binds the edge of your knitting into one piece. Instead of having loops at the edge, you'll have a nice seam like you do at the edge where you cast on. Binding off is fairly simple. You simply knit stitches, and pass them over other stitches, just a couple at a time. The following video will teach you how.


Practice!

Alright folks, it's up to you to perfect your knitting, purling, decreases, increases, casting on, and binding off, because next week we're going to learn how to read a simple pattern, and you'll get a chance to knit an actual finished project if you'd like before we dive into some more complicated techniques (like knitting in the round). Good luck, and I'll see you next week!

Sunday, September 9, 2012

Week Three: Purl, Baby, Purl

Week Three: Purl Stitch, Ribbing, and Seed Stitch


At this point you should have a pretty firm grasp of the knit stitch, and be able to knit a block of garter stitch (knitting every stitch). Today, we're going to add the knit stitch's best friend: the purl stitch.

What is the Purl Stitch?

The knit stitch, done over and over, creates a stitch shaped like a little "V". If you were to look at the other side of each stitch, you would see a little bump. It's kind of like if you had a sheet of clear glass and drew an arrow facing left. From the other side of the glass, you would see an arrow facing right. It's the same arrow, but looks different depending on which side you look at.

Your block of garter stitch contains purl stitches--- they are simply the knit stitches you made, but viewed from the other side. Today you're going to learn how to make those purl stitches on the right side of your fabric. If you knit one row, turned your fabric, and purled your next row, what would your fabric look like? When viewed from the front, it would look like two rows of knit stitches. From the back, it would look like two rows of purl. This will make more sense as we go on.

How to Make a Purl Stitch:


If you viewed this process from behind, it would look exactly like a knit stitch.

Practice!

To get comfortable with the purl stitch, go ahead and just purl a few rows. You can do this on the same piece that you practiced your knit stitch---- don't bother re-casting on, just switch from knitting to purling. 

After you've knit five or ten rows and you think you have it down, move on to the next part of our lesson.

Ribbing

If you pick up a knit item, you'll notice that most of the edges (the sleeves or neckline on a sweater, or the brim of a hat) are ribbed. This is what ribbing looks like:


This is 2x2 ribbing. What does that mean? It's simply two stitches of ribbing, then two stitches of purling, alternating over and over and over. It's not quite that simple though.

To create this type of fabric, on your first row you will knit two stitches, purl two stitches, knit two stitches, purl two stitches, over and over until you reach the end of the row. Then it gets tricky. Once you flip your fabric, the back of your knit stitches look like purls, and the back of your purl stitches look like knits. So what do you do? You keep following that pattern. Everything you knit on the first side, you purl on the second side. Everything you purl on the first side, you knit on your second side. The easiest way to figure out what to do is to remember what you did on the last two stitches of your first row, and then do the opposite for the first two stitches of the next row. For example, if my last two stitches were purls, then my first two stitches on the next row will be knit.

The important thing is to match up your stitches. Here is a quick little chart to help you figure out what I mean. The X's represent knit stitches, and the O's represent purl stitches. 

XXOOXXOOXXOO
XXOOXXOOXXOO
XXOOXXOOXXOO
XXOOXXOOXXOO

Seed Stitch:

Seed stitch is kind of like ribbing (you will be alternating knit and purl stitches), but done "wrong". It's just like 1x1 ribbing (one knit stitch, one purl stitch, one knit stitch, on purl stitch), but every time you flip the fabric, you do the opposite of what you're supposed to do. In ribbing, you always knit the knits and purl the purls. For seed stitch, you purl the knits and knit the purls. Here is a chart to show you what I mean:

XOXOXOXOXOXO
OXOXOXOXOXOX
XOXOXOXOXOXO
OXOXOXOXOXOX

Compare that to the ribbing chart and you'll see what I mean. Here is what a swatch of seed stitch looks like:


Why Alternate Knits and Purls?

So why bother learning how to purl? You've already managed to make a decent swatch of fabric using only the knit stitch--- isn't that good enough? 

Sure. For certain things, a knit stitch is really all you need. It's possible to knit plenty of items: scarves, washcloths, even certain types of hats. But learning how to purl will give your knitting much more variety, and also serves some functional purposes. Regular swatches of stockinette stitch will "curl" on the ends---- very unsightly. Imagine a nice long sweater that curls up around your bellybutton. Yuck.


Giving your stockinette a border keeps this curl from happening. Knits and purls tend to "pull" in opposite direction. Finding a nice balance between those two forces keeps your knitting nice and flat.


Ribbing is also also much more elastic that garter stitch or stockinette, which is why you'll often see it around the edges of socks or the cuffs of sweaters. It naturally keeps the knitting from gaping, and gives you a snug, stretchy fit.

Practice:

Your task for this week is to practice stockinette, ribbing, and seed stitch. To do stockinette: knit all of the stitches on side A of your fabric, flip it over, and purl across the other side. Repeat until you get a decent sized swatch.

Then practice a swatch of ribbing. Feel free to do this on the same piece of fabric you've been working on since last week. You can do 2x2, 3x3, 2x3 ribbing, or whatever really. Just make sure you knit the V's, and purl the bumps.

Then practice seed stitch. Remember, this is 1x1 ribbing, but purposely mismatched every other row. Knit your bumps, and purl your V's. 

If you have any questions, again, feel free to post questions here, or on /r/beginningtoknit.

See you next week!

Tuesday, September 4, 2012

Resources for Budding Knitters

As I promised earlier last week, below are some awesome resources for both beginner and experienced knitters. 

Stitch and Bitch: The Knitter's Handbook


Not only does this book cover the bare-bones basics of knitting (including information about yarn and fiber types, needles, historical background, how to read patterns, etc), it also includes a dozen or so patterns ranging from the very basic to more advanced techniques like cables. It's a wonderful reference if you forget how to do something basic like a purl stitch, or how to do a right-slanting decrease. If I had to recommend one book, I think this would be it.

Knitting Without Tears


 This book is an oldie, but a goodie. Elizabeth is a passionate, very traditional knitter. This book is less "flashy" than more popular, recently-published books, but contains wonderful concepts concerning yarn craft. Rather than learn step-by-step instruction, Elizabeth covers shaping, blocking, pattern design, pattern modification, gauge, etc. I think it's a wonderful way to understand knitting overall, rather than just becoming a machine capable of cranking out a hat strictly following a pattern with no originality. You might want to save this book for the end of this class, once you have a better general concept of the material at hand.

Ravelry


For you digitally-inclined knitters, Ravelry is THE website to visit. Their sign-up process is a bit of a pain (you have to wait for the invite to be sent to your email, which can take a few days), but so worth it. This website is sort of like Facebook meets an intense searchable pattern library, with forums to boot. I pretty much find all of the patterns that I use through Ravelry (many of them are free, and you can add search filters to only include those that are). You can also digitally store these patterns, the types of yarns you have in your stash, etc. Definitely check this out.

www.ravelry.com

Knitty


Knitty is an awesome, free, online knitting magazine published four times a year. Each issue includes about twenty unique patterns covering a range of difficulty from easy to super-duper-advanced (and a couple even focus on hand-spun yarn). In addition to the patterns, there are about a dozen or so articles and product reviews that cover a wide variety of topics. Definitely worth looking at, and the backdated issues are accessible and free too!

www.knitty.com


Sunday, September 2, 2012

Let's Get This Party Started

Week 2: Casting On, Knit Stitch

Hopefully everyone understood  the information presented in our last lesson, and got a chance to go  purchase some supplies. To get started today, you will need your knitting needles (straight or circular), and your yarn. Today's lesson has three main parts: how to tie a slip knot, how to cast on, and how to knit your first stitches.

The Slip Knot

Before you can start making loops and pulling other loops through those loops, you have to attach your yarn to the needle. If you don't, the whole thing will just unravel and fall apart. The easiest and most effective way to do this is by tying a slip knot. The cool thing about a slip knot is that it automatically will adjust to be the right size, and works kind of like a little noose around the knitting needle. There are three steps to tying a slip knot:

 Form a little loop with your yarn, making sure the tail of the yarn is behind the loop where you can easily grab it.
 Using the needle (or your finger), pull that tail through your loop. If you do it with your finger, you can then transfer the loop onto the needle.
Pull on the loop and the tail until it tightens up around your needle. You don't want to pull too tightly, but you don't want the loop to fall off the needle either (if the loop falls off the needle, it will come undone).

For those of you that do better with videos instead of pictures: 


Not only does your slip knot attach your yarn to your needle, it actually counts as your first "stitch". Now that your yarn is on the needle, you can start casting on, which is the process of putting more loops on your needle that you will then knit.

Casting On

Now that you have one loop on your needle, you need to add some more. How many you cast on will determine the width of your fabric. Remember last week when we talked about gauge? Well, if a four inch by four in piece of fabric is 15 stitches wide, and you need to make an eight-inch wide piece of fabric, you're going to cast on 30 stitches. If you only want to knit a two-inch piece of fabric (for say, a super-skinny scarf), you want either 7 or 8 stitches (since we can't cast on 7.5 stitches).

There are a bunch of different ways to cast on depending on what you're trying to do (certain types of cast-ons look different and lend themselves to different types of projects), but my personal favorite is the backwards loop cast-on. It's super-duper easy to do, and is suitable for a lot of different projects.


To do this kind of cast on, you repeatedly make loops of yarn, twist them around backwards, and slide them onto your needle. Give the tail of yarn a tiny tug to pull it snugly onto the needle, but be careful not to do things too tightly. This goes for knitting too--- if things get pulled too tight, it'll be very very difficult to knit.

And again, here is a nice little video demonstrating the backwards loop cast-on, with a brief review of our slip knot:

<iframe width="560" height="315" src="http://www.youtube.com/embed/BE_XD854iMo" frameborder="0" allowfullscreen></iframe>

The Main Event: Getting to Know the Knit Stitch

The part you've all been waiting for! The knit stitch is, obviously, the foundation of knitting. It's the reverse of the purl stitch (which you will learn next week), and looks like a purl stitch from behind. The knit stitch, which done over and over and over creates little rows of "V"s, like you see in the picture below. This type of fabric is known as "stockinette", and is probably the most common type of fabric made by knitters:


The back of this knit-stitch fabric looks like a bunch of bumps, and is is equivalent to a bunch of rows of purls (this will make more sense after next week). This fabric, shown below is known as 'reverse stockinette':


Now keep in mind, the fabric you are about to knit isn't going to look like either of the above pictures. Why is this? Because the fabric you are going to knit is going to be worked on both sides. On your first row (and every odd-numbered row), you will be working on Side A of the fabric, and on your second row (and every even numbered row), you will be working on Side B. Because you will be using ONLY the knit stitch, and working the fabric from different sides, every other row will look like purl stitches when viewed from one side. You will not get those pretty little V's on one side of the fabric, and those pretty little bumbs on the other. Instead, each side of the fabric will have alternating rows of knits and purls. This type of fabric is known as garter stitch, and is another extremely common type of knitting. It looks similar to reverse-stockinette, but if you stretch it out a little bit, you will see those little "V's" on every other row:


This week, you are going to practice making a swatch (otherwise known as a "test piece") of garter stitch. You will do this by casting on a certain number of stitches (I suggest trying fifteen, or enough to make a 4"x4" piece if you are using different size needles and yarn than I recommended last week), and repeating the knit stitch until you reach the end of the row, flipping your fabric around, and then knitting across those stitches. You repeat these steps over and over to create more rows.

How to Make a Knit Stitch

There are two different ways to knit: Continental and English. In Continental knitting, the yarn is held in the left hand, and in English, the yarn is held in the right hand. There are definite advocates of both methods (and I would chance a guess that English is more popular), but I'm a personal fan of Continental for a couple of reasons. While any sort of knitting is going to be slow and awkward at first, Continental is much, much, much faster than English once you get them both down pat. Also, it'll be easier to learn other needlecrafts if you are comfortable holding the yarn in your left hand (crocheters hold yarn in their left hand). I also find that tension is much easier to control in continental knitting once you learn how to do it.

Feel free to choose your own method. It'll probably be easier to start out with English knitting, but I really recommend that you at least give Continental a shot. 


And for those interested in learning English style: 


So I Knit All My Stitches: Now What?

So you cast on fifteen stitches, and have knit all of your stitches off of your first needle and onto your second. What now? Simply take the needle in your right hand (the one with all your stitches now on it), and swap its position with your left one. Then repeat the process. Each time your needles switch hands, you've completed a single row. Each row should have the same number of stitches as the row before.

Um.... Ooops?

So you might find yourself with a couple of problems as you learn to knit. Try these simple tips if you're having any problems:

I started with fifteen stitches, and now I only have 12---- what'd I do wrong? 

You're accidentally dropping stitches. Either you've completed the stitch properly and let it somehow fall off your right needle, or you didn't actually create a stitch properly while it was still on the left needle. Maybe you did this by wrapping the yarn around the right needle in the wrong direction, or not wrapping it at all. Watch the video super closely and make sure you're completing all of the steps exactly as shown. 

I started with fifteen stitches, and now I have 20! What did I do wrong?

You're not actually sliding the stitch off the left needle once you finish, and are knitting repeatedly into the same stitch. Make sure that once you pull a new loop through one of your stitches, you slide that stitch off of your left needle so that you don't accidentally knit through it twice. 

Your Turn!

So practice making a slip knot, casting on with your backwards loops, and knitting a few rows. To really get comfortable with it, I'd recommend knitting at least 30 or 40 rows about 15 stitches wide. 

If you have any questions, feel free to post videos or pictures of your knitting to /r/beginningtoknit. 

Also, keep an eye on this blog during the week--- I'm working on a post linking to other resources you may want to check out now that you know some of the basics.


Sunday, August 26, 2012

Intro To Knitting

In this lesson we will be hearing a tiny bit about what knitting is, as well as an overview of the materials and required to partake in such a glorious fiber art  adventure. I'm also going to suggest a few resources for budding knitters-to-be. Several are free, online sources. Others might cost you a few dollars on Amazon, or the gas money to get to a local library. Then, your assignment: visit a local crafting or hobby store (even Wal*Mart will do), and pick up some cheap supplies to get started. So hold onto your pants (whether they be made of natural fibers or some newfangled acrylic wonder), and let's begin.

Knitting: A Super Duper Brief History

Due to the rapid decomposition of natural fibers, very little is known about the history of knitting. Ancient yarn was all made from plant or animal fibers, which decompose pretty rapidly (historically speaking), so little remains of ancient knit items. There are a few old items that remain (mostly socks) made around the year 1000 CE. Knitting was an important skill back in the old days--- it made a very flexible fabric compared to the woven or felted clothing of yesteryear--- but in modern times is largely a hobby or cultural phenomenon. Machines now exist that can knit sweaters in minutes--- compared to the dozens, perhaps hundreds of hours it used to take. Different regions have developed different knitting styles or techniques, many of which are still practiced today.

An ancient cotton sock found in Egypt, made somewhere around 1000 CE.


Knitting comes from the word knot, though that's actually somewhat of a misnomer. Knitting is more a process of pulling loops through other loops, though the occasional knot is useful (for example, the slip knot used at the beginning of casting on). 

So What Is Knitting?

Knitting is the process of making a flexible fabric using two or more pointed sticks and some sort of string (or plastic, or wire. Really, anything flexible enough to be worked through the needles can be knit into fabric). In this class, we're going to focus almost exclusively with two needles and yarn. 


Two hands juggle both needless, the yarn, and the fabric that is attached to the needles.


As I stated above, knitting is basically done by forming yarn into loops, and then pulling yarn through those loops, repeating the process over and over and over and over until your fingers are raw and your mind is numb. Just kidding---- it's actually quite fun, and there's variation upon variation to keep things interesting. 

Knitting & Crocheting

Many uninformed fiber-art spectators commonly confuse the two most popular fiber arts--- crocheting and knitting. Crocheting is done with one hooked needle, and results in a much thicker, less-flexible material (though crocheted lace is also quite common). It also uses about 1/3 more yarn than knitting does. It's also much younger than knitting, being developed about 200 years ago. Crocheting does have a few advantages: it's typically faster, and mistakes can be fixed much more easily than knitting errors. There's also only one needle (or hook) involved, which can make things a bit easier. Personally though, I much prefer knitting--- the stretchy fabrics are much more flattering when made into clothing.

While it may be difficult at first, with some practice you will easily be able to tell the difference between knit and crocheted items. 

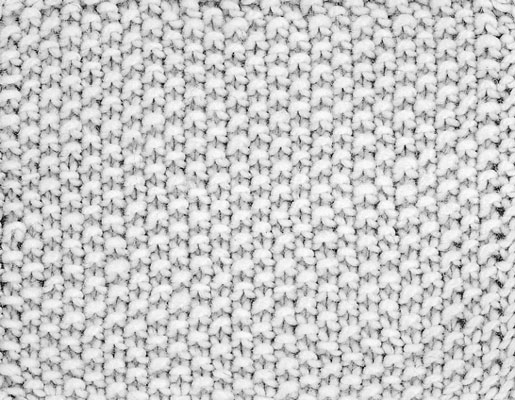
The tight, v-shaped stitches typical of knitting. This fabric is extremely flexible.

The denser, firmer fabric typical of crochet. This fabric is much stiffer than knitting.

The Tools of the Trade: Yarn, Needles, Oh My!

You could probably get started knitting with two sharpened pencils and an unraveled cassette tape if you wanted, but for the sake of making a nice finished product, it makes sense to invest in the right tools. There are lots of crazy tools and accessories, and an avid knitter could easily spend a few hundred dollars in a nice yarn store. Electric ball winders, stitch-marker charms, loom knitting machines---- the list goes on. For this course, you're going to need the bare bones basics: some yarn, some needles, and some scissors. I'll also recommend some optional accessories at the end, but if you don't have/can't afford them, don't worry about it! So lets get started.

Yarn

There are tons and tons and tons and tons of different kinds of yarns, but they really all fall into three different camps: Plant-based fibers, animal based fibers, and synthetic fibers. 

Here's a basic rundown, pulled right from the wonderful world of Wikipedia. Keep in mind that there are MANY different yarns not included in the following list:


Plant-Based Fibers


 Animal-Based Fibers


 Synthetic Fibers


Not only are there lots of different kinds of fibers, they're spun together in all kinds of different ways, giving us thick yarns, thin yarns, uneven yarns, smooth yarns, fuzzy yarns, funky yarns, thread-weight yarn, etc. yarn could be almost thick and rope-like, or as fine as cobwebs. Each thickness has a name. The most common weight of yarn (and the weight we will be using in this course), is knows as "worsted weight". The majority of yarn you'll find in non-specialty shops is worsted weight yarn. 


You'll also notice in the picture above the measurements above each thickness of yarn. As you may have deduced on your own, different thicknesses of yarn yield different sized stitches, which result in more or few stitches to form the same amount of fabric. This difference in number of stitches per unit of fabric is known as the gauge. Lets take a look at the information you'll typically see on a skein of yarn (a skein is just another fancy word for a unit yarn is sold in--- the form you'll typically see at big-box stores. Specialty yarn stores tend to sell yarn in balls or hanks, which are a big coil of yarn wrapped twisted into itself).


The first square on the left tells us are thickness. This yarn is a worsted weight yarn, making it your typical, run-of-the-mill weight.

The second square tells us our approximate gauge. I say approximate because every knitter's gauge is different. If I handed you a ball of yarn and two needles, your stitches wouldn't be the exact same size as mine, even if I used the exact same yarn and needles. This will be very very important later on. We'll just take this at face value, and estimate that with this ball of worsted weight yarn, every 15 stitches with be about four inches wide, and every 22 rows will be about four inches tall. To knit a four-by-four square, you'll have to knit about 330 stitches. This square indicating our gauge also tells us which needle size to use (a 5 mm, or size 8 needle).

We can ignore the last few squares--- one indicates our approximate crochet gauge, and the others are our washing/drying/ironing instructions.

The best way to get familiar with different kinds of yarn is to visit your local hobby store, touch a bunch of yarn, and read each label closely.

Knitting Needles

Needles also come in an assortment of varieties and materials. Your main three types of needles are straight needles (the kind you typically see in pictures), double-pointed needles (short needles with a point on each end), and circular needles (two needles points attached to one another with a piece of wire). In this course, we'll start with straight needles, and advance to circular needles later. 


You can also choose from a variety of materials. Most needles are made from plastic, metal, or wood (though some are made from bone or other unique materials). Plastic needles are definitely cheapest, but you might find them slippery or sticky. I personally love bamboo needles, but keep in mind that they do cost a bit more.

These needles come in different sizes. Some will be as thick as a toothpick, others as thick as a broom handle. The width you'll most commonly use is about as thick as a pencil. There are typically two measurements given on a package of needles to indicate their size. There is the actually measurement given in millimeters, and the size. Kind of like how pants might have a 30-inch waist, but you could also just say they're a size eight (see the yarn label above to see how both measurements are given).

The combination of the thickness of your yarn and the size of your needle will determine the thickness of your fabric. Normally the yarn label will suggest a size, but you could go up or down a couple sizes if you wanted to, depending on the effect you were trying to achieve.

Now It's Your Turn

So now that you have a basic idea of what we're trying to do, it's your turn to go out and actually get some supplies. For your first project, you're going to need a skein (or ball, or hank) of yarn, and a pair of straight needles that are about a foot long (though you might consider circular needles instead. I'll explain below). 

If you're working on a tight budget, you might want to check your local dollar store or hobby store clearance section. You'll probably be working with an acrylic yarn and plastic needles. Some cheap yarns to consider: Red Heart is a super cheap acrylic yarn (on clearance, you can pick up a skein for a quarter), but it's not very soft. It's good for items you're not planning on wearing, like dish towels or decorative pillows. Caron Simply Soft is another cheap acrylic yarn, but it actually feels quite nice. Again, you can find this for just a dollar or two. 

There's a wide variety of mid-range yarns you can use that cost around $5 a skein. Some of my favorites: Paton's classic wool (be careful washing this though---- I'll explain later), Sugar 'n' Cream is a wonderful pure cotton yarn in nice colors, Lion Brand Wool-Ease is a nice blend as well. If you're looking to make an investment in needles, I would really recommend a nice pair of bamboo needles. Seriously, your stitches will be smoother, looser, and neater, and they really only cost $7 or $8.

If you want to spend a decent chunk of money, feel free to visit your local yarn store and ask some questions. Superwash merino is a wonderful fiber that feels soft and smooth and behaves like wool (cause it is), but it's treated with a chemical to keep it from shrinking in the wash. You could also buy a set of needles in different sizes, or a set of interchangeable circular needles. It'd be easy to spend $100 right off the bat if you really wanted to, but consider exercising some restraint until you figure out what you really need.

Some Tips for Everyone:

Please stick to worsted weight, standard yarn. I know there might be some really pretty angora laceweight yarns, or fun looking thick-and-thin bulky handspun. Trust me though, it's going to be very tricky to learn how to knit if you can't really see your individual stitches. If you really really really can't help yourself, aim on the side of thicker yarn rather than thinner. But trust me, you don't want a crazy looking yarn with lots of texture, bumps, sequins, or anything fancy. You won't be able to see your stitches, and you're going to get really frustrated.

I know I told you you want straight needles, but consider buying a pair of circulars. Why? Because you can actually use circular needles the same way you can use straight needles, but can't use straight needles the way you use circular ones. And bonus: they're attached to one another so you can't drop them! And, since you'd only be buying one pair of needles instead of two, you could maybe consider buying one nice pair instead of two cheap pairs. Worth every penny, I promise you. Circular needles have one other important measurement---- the length from tip to tip. Look for a 12 or 16 inch set.

If you're going to a big-box hobby store like Michael's, Jo-Ann's, or Hobby Lobby, look online for a coupon. You can easily save 40% on one item, which could save you a few bucks. Consider just buying one item at a time, and you could save that much on your whole purchase. Also, many stores accept competitors coupons, so trying bringing a few different ones and doubling up. 

If I were personally taking this class, I think I would buy a skein of Paton's Classic Wool yarn, and a set of size 8 Clover Bamboo circular needles. Don't take this as gospel though, folks. Buy what you want, and make sure it's something you personally like.

You might want to take a glance at the washing instructions before you buy your yarn. Lots of animal fiber yarns will felt when washed. What does this mean? Each hair has teeny tiny microscopic hooks along its' length (kind of like those spiky plastic drain cleaners you see in the Drain-O commercials). When you was these animal fibers, the friction from the washing machine combined with the soap opening up the hair's cuticle causes the fabric to mash together and get stuck that way. Your pretty knit scarves will just become dense, tiny, inflexible pieces of useless fabric. 


So For Next Week:

Make sure you have a pair of needles, a set of needles in an appropriate size (check your yarn label to make sure, or just get a worsted weight yarn at a set of size 8 needles), and some scissors. We'll get started doing some actual knitting and you'll have a nice scarf or dishtowel before you know it!