Week Three: Purl Stitch, Ribbing, and Seed Stitch
At this point you should have a pretty firm grasp of the knit stitch, and be able to knit a block of garter stitch (knitting every stitch). Today, we're going to add the knit stitch's best friend: the purl stitch.
What is the Purl Stitch?
The knit stitch, done over and over, creates a stitch shaped like a little "V". If you were to look at the other side of each stitch, you would see a little bump. It's kind of like if you had a sheet of clear glass and drew an arrow facing left. From the other side of the glass, you would see an arrow facing right. It's the same arrow, but looks different depending on which side you look at.
Your block of garter stitch contains purl stitches--- they are simply the knit stitches you made, but viewed from the other side. Today you're going to learn how to make those purl stitches on the right side of your fabric. If you knit one row, turned your fabric, and purled your next row, what would your fabric look like? When viewed from the front, it would look like two rows of knit stitches. From the back, it would look like two rows of purl. This will make more sense as we go on.
How to Make a Purl Stitch:
If you viewed this process from behind, it would look exactly like a knit stitch.
Practice!
To get comfortable with the purl stitch, go ahead and just purl a few rows. You can do this on the same piece that you practiced your knit stitch---- don't bother re-casting on, just switch from knitting to purling.
After you've knit five or ten rows and you think you have it down, move on to the next part of our lesson.
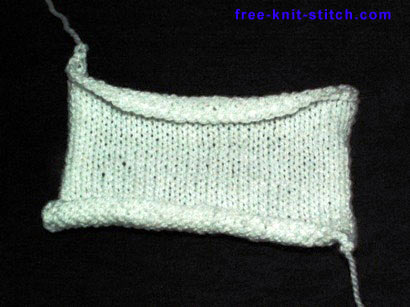
Ribbing
If you pick up a knit item, you'll notice that most of the edges (the sleeves or neckline on a sweater, or the brim of a hat) are ribbed. This is what ribbing looks like:

This is 2x2 ribbing. What does that mean? It's simply two stitches of ribbing, then two stitches of purling, alternating over and over and over. It's not quite that simple though.
To create this type of fabric, on your first row you will knit two stitches, purl two stitches, knit two stitches, purl two stitches, over and over until you reach the end of the row. Then it gets tricky. Once you flip your fabric, the back of your knit stitches look like purls, and the back of your purl stitches look like knits. So what do you do? You keep following that pattern. Everything you knit on the first side, you purl on the second side. Everything you purl on the first side, you knit on your second side. The easiest way to figure out what to do is to remember what you did on the last two stitches of your first row, and then do the opposite for the first two stitches of the next row. For example, if my last two stitches were purls, then my first two stitches on the next row will be knit.
The important thing is to match up your stitches. Here is a quick little chart to help you figure out what I mean. The X's represent knit stitches, and the O's represent purl stitches.
XXOOXXOOXXOO
XXOOXXOOXXOO
XXOOXXOOXXOO
XXOOXXOOXXOO
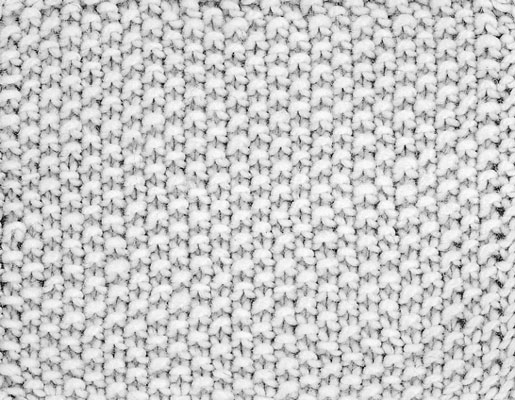
Seed Stitch:
Seed stitch is kind of like ribbing (you will be alternating knit and purl stitches), but done "wrong". It's just like 1x1 ribbing (one knit stitch, one purl stitch, one knit stitch, on purl stitch), but every time you flip the fabric, you do the opposite of what you're supposed to do. In ribbing, you always knit the knits and purl the purls. For seed stitch, you purl the knits and knit the purls. Here is a chart to show you what I mean:
XOXOXOXOXOXO
OXOXOXOXOXOX
XOXOXOXOXOXO
OXOXOXOXOXOX
Compare that to the ribbing chart and you'll see what I mean. Here is what a swatch of seed stitch looks like:
Why Alternate Knits and Purls?
So why bother learning how to purl? You've already managed to make a decent swatch of fabric using only the knit stitch--- isn't that good enough?
Sure. For certain things, a knit stitch is really all you need. It's possible to knit plenty of items: scarves, washcloths, even certain types of hats. But learning how to purl will give your knitting much more variety, and also serves some functional purposes. Regular swatches of stockinette stitch will "curl" on the ends---- very unsightly. Imagine a nice long sweater that curls up around your bellybutton. Yuck.
Giving your stockinette a border keeps this curl from happening. Knits and purls tend to "pull" in opposite direction. Finding a nice balance between those two forces keeps your knitting nice and flat.


Ribbing is also also much more elastic that garter stitch or stockinette, which is why you'll often see it around the edges of socks or the cuffs of sweaters. It naturally keeps the knitting from gaping, and gives you a snug, stretchy fit.
Practice:
Your task for this week is to practice stockinette, ribbing, and seed stitch. To do stockinette: knit all of the stitches on side A of your fabric, flip it over, and purl across the other side. Repeat until you get a decent sized swatch.
Then practice a swatch of ribbing. Feel free to do this on the same piece of fabric you've been working on since last week. You can do 2x2, 3x3, 2x3 ribbing, or whatever really. Just make sure you knit the V's, and purl the bumps.
Then practice seed stitch. Remember, this is 1x1 ribbing, but purposely mismatched every other row. Knit your bumps, and purl your V's.
If you have any questions, again, feel free to post questions here, or on /r/beginningtoknit.
See you next week!
No comments:
Post a Comment